Showing posts with label windows tricks. Show all posts

Monday, 29 July 2013

VBScript - How to make a text encryption program


     * This is a simple HTML application which can encrypt and decrypt the text entered into a text box using the given key. The encryption algorithm is really simple and the output is in only uppercase alphabet letters and numbers. The drawback of the program is that it will double the length of the string when encrypting. Don't use this encryption program as the only source of security for important data.
To make the encryption program save the following code with .hta extension using notepad.

Copyright © 2013 | By - Anbuselvan


Remember to leave your ratings and comments. Also share the blog with your friends and family!


Continue Reading →

Monday, 1 July 2013

Genuine Windows 7 Became Pirated? Make It Original 


Its a common problem which lots of Windows 7 users face. We have received many emails about this problem, so today we are sharing a working solution for it. In fact many Windows 7 SP1 RC users are also facing this problem.


 Caution :- The Original post credits goes to askvg.com
Problem Symptom:


*You were using genuine Windows 7 without any problem. It was activated properly. But one day when you logged into Windows, you received following message :
                                                         Windows is not genuine :(
 
Your computer might not be running a counterfeit copy of Windows.


This_Copy_of_Windows_is_not_Genuine.png


     Along with the above mentioned message, you also noticed that the desktop background became black and following error message was shown on the bottom right corner of the screen:
This copy of Windows is not genuine.
Also when you checked System Properties, you got following error message:
You must activate today. Activate Windows now.
Problem Cause:
     Actually this problem occurs when there is a lack of permissions on a registry key "HKEY_USERS\S-1-5-20". By default, System, Network Service and Administrator accounts have "Full Control" and "Read" permissions on this registry key. But sometimes "Network Service" doesn't have proper permissions on this registry key and you face this problem. This may be the result of applying a Plug and Play Group Policy object (GPO). The Licensing service uses Plug and Play to obtain your system hardware ID information and binds the license to the computer. By default, it doesn't have proper permissions to access Plug and Play service.
Problem Solution:
There are 2 solutions actually. You can try them one by one:
METHOD 1: Using RSOP
1. Type rsop.msc in RUN or Start Menu search box and press Enter. It'll open RSOP (Resultant Set Of Policy) window.
2. Now go to:
Computer Configuration/Windows Settings/Security Settings/System Services
3. In right-side pane, check "Startup" type of "Plug and Play" service. It should be set to "Not Defined". If its not, double-click on it and set its Startup type to "Automatic".


Resultant_Set_Of_Policy.png


4. Now provide following command in RUN or Command Prompt:
gpupdate /force
5. That's it. Restart your system and your problem should be fixed.
METHOD 2: Using Registry Editor
1. Type regedit in RUN or Start Menu search box and press Enter. It'll open Registry Editor.

2. Now go to following key:
HKEY_USERS\S-1-5-20
3. Right-click on "S-1-5-20" key and select "Permissions...". It'll open a new window.

4. Select "NETWORK SERVICE" in user list and check "Allow" box given for "Full Control" permission. Click on OK button to apply the changes.


Permissions_S-1-5-20_Registry_Key.png 


NOTE: If "NETWORK SERVICE" is not present in user list, click on "Add" button. Now type Network Service in "Enter the object names to select type" and click on "Check Names" button. It'll detect and confirm the username. Click on OK button.

5. That's it. Restart your system and your problem should be fixed.


Continue Reading →

How to remove Windows 7 Genuine Notification Completely

Windows 7 Genuine Notification
Windows 7 activation
windows 7


           Hello Guys Today I Came With Some Amazing Stuff To Remove Very Annoying Notifications Of Windows Genuine On Windows 7.
   Many Of my friends Suffering From This Problem Now A Days And There Is No Other Solutions To Remove This Type Of Notifications.

Why its happens ? :
                
          If You Don’t Buy A Genuine Windows 7 Version Than It Has Happened To You. And It Is So Annoying.

Ok, How to get rid of it Completely? 

                        So, Today I Give You The Software With Tutorial To Help You Remove This Type Of Notifications Completely From Your Windows 7.

So Follow The Procedure Here…

         First Of all Download The RemoveWat Software From The Below Link.

What is RemoveWat ? 

     => RemoveWat Is A Software That Help Us To Remove Windows 7 Genuine Notifications Completely From It. Here I Packed Latest Version Of RemoveWat 2.2.5.

Click Here To Download (3.74 MB)

After Download The Package, Extract It To Your Pc And Open RemoveWat.exe.
Note That It Is Recommended To Close All Programs Before Open It.
 
UPDATE : If Your Antivirus Prompt You The File As Virus, Then Don’t Worry, It Only Show Because Windows Don’t Like It Because It Removes Windows Genuine Notifications. It’s Not A Virus So Enjoy Using It.
 
After Open It Click On RemoveWat And Wait For 2 Minutes And After It’s Done, Your Pc Will Be Restart.

After Restart Your Windows Pc, You Can See That All Notifications Of Windows Genuine Will Be Removed And You Have A Completely Genuine Windows 7.


Continue Reading →

Sunday, 30 June 2013

Windos server 2008 r2 Enterprise edition X64 & X84


Details

Note: There are multiple files available for this download. Once you click on the “Download” button, you will be prompted to select the files you need.
Version:
Date Published:
1.0
10/28/2009
File name:
File size:
README.htm
56 KB
TestDriveProgramEULAWS2008.htm
171 KB
WS2008R2Fullx64Ent.part01.exe
700.0 MB
WS2008R2Fullx64Ent.part02.rar
700.0 MB
WS2008R2Fullx64Ent.part03.rar
586.9 MB
    The Microsoft VHD Test Drive Program provides customers a flexible, extensible and supported evaluation experience requiring minimal hardware and IT overhead. You can access the catalog of pre-configured Microsoft solutions in VHD format for test, evaluation, demonstration, training & education and proof of concept from www.microsoft.com/vhd.

    This download helps you evaluate the new features of Windows Server 2008 R2. You’ll have the opportunity to try new and improved features and functionality of Windows Server 2008 R2 free for 180 days. Windows Server 2008 R2 builds on the award-winning foundation of Windows Server 2008, expanding existing technology and adding new features to enable IT professionals to increase the reliability and flexibility of their server infrastructures. New virtualization tools, Web resources, management enhancements, and exciting Windows 7 integration help save time, reduce costs, and provide a platform for a dynamic and efficiently managed data center. Powerful tools such as Internet Information Services (IIS) version 7.5, updated Server Manager and Hyper-V platforms and Windows PowerShell version 2.0 combine to give customers greater control, increased efficiency and the ability to react to front-line business needs faster than ever before. To find out more about Windows Server 2008 R2, please visit the product homepage. Please note that this product is available for evaluation purposes only and should not be used in a production environment.
    This is a preconfigured virtual machine set contained within the Virtual Hard Disk (VHD) format. Windows Server 2008 Hyper-V, Microsoft Hyper-V Server 2008, or the R2 versions of these products is required to use this virtual machine. Please refer to the system requirements section for more details. 
     

System Requirements

Supported Operating System
Windows Server 2008 R2
    Windows Server 2008 Hyper-V is required to use this virtual machine
    In addition to the system requirements for Windows Server 2008 as described in the release notes, a 64-bit system with hardware-assisted virtualization enabled and data execution prevention (DEP) is required.
    It is also recommended to ensure that you have a clean install of x64 edition of Windows Server 2008 to be able to use the Hyper-V technology.
    Prerequisites, installation steps, OS recommendations, and known issues of Hyper-V can be found here
How to Install ?
         In order to use this evaluation package you will need to have Microsoft Hyper-V installed on a physical machine.
Hyper-V is available on Windows Server 2008 only and the details on how to install Hyper-V can be found here. Details of how to setup the VHD are included in the documentation that accompanies the product.

Download Links :-

Windows Server 2008 R2 Enterprise Edition x64 (Full Install) VHD 

For WS2008R2Fullx64Ent.part01.exe click download Now below to download that


For WS2008R2Fullx64Ent.part02.exe click download Now below to download that


For WS2008R2Fullx64Ent.part03.exe click download Now below to download that


For README file click download now below to download that..


ANy problem pls leave your valuable comments below and keep updated, thanks..
Happy hacking..

Continue Reading →

Find the IP address of a website using CMD


     Today I am going to show you how to get the IP address of a website using CMD. It is easier than you might have imagined. Just a simple command will do the trick.
There are two basic commands which you can use to get the IP: tracert and ping.
 *Open the CMD and type either of the commands below.
Replace www.example.com with the site you want to get the IP address of.

tracert www.example.com
ping www.example.com
When the ping and tracert command is run something like this will show up:

Pinging www.example.com [192.0.43.10] with 32 bytes of data:
Tracing route to www.example.com [192.0.43.10]
In both cases the IP address is between the square brackets. Keep tuned for my future posts!


Continue Reading →

VBScript prime number generator


  This is a really cool HTML application which finds all the prime numbers in a given range. This program is pretty fast for low ranges and may raise the core usage to 100 or 90 percent for very large ranges. So I prevented large ranges from being entered as it caused some errors and caused the computer to crash.
The VBScript used in the program is really simple. The program tries to get a integer number by dividing it with all possible numbers and if does not get an integer the number is confirmed as a prime number. This process is repeated for all the numbers in the given range.
To make the program paste the following code in notepad and save with a .hta extension.

Copyright © 2013 | Prime Calculator - By #XByte


Continue Reading →

Make a simple windows 7 gadget

 First of all what are gadgets? 

Gadgets are lightweight HTML and script-based applications which can present information or provide functionality from a variety of sources such as websites or services. To make a gadget you need to know the basic of HTML.


     * In this tutorial I am going to show you how to make a simple windows 7 gadget. A basic gadget needs an XML file named exactly gadget.xml and an HTML file with the gadget name. Also you can include any pictures needed in the gadget. In this tutorial I am going to show you how to make a simple demo clock gadget which would display time in a simple way. Just follow the steps given and if you know basic HTML you will find it easy to understand.


Procedure to make a gadget.. 
 
Step 1:  First of all make a new folder on your desktop and rename it anything you want.

Step 2: Put the html file which would be your gadget into the folder and rename the file as the name of the gadget. In this case the name would be NXClock.html. The demo code for the html is given below.

Caution : If u know HTML mess with it or else dont modify just learn and come back to make a gadget..


Step 3: Now save the following code as gadget.xml EXACTLY into the folder you created earlier. Do not name it anything else or the gadget will not work. You must replace the NXClock.html with the name of the html file if you are making your own gadget. And you can change the title too.

Caution : If u know HTML mess with it or else dont modify just learn and come back to make a gadget.. 


Step 4:  Add the NXClock.html and gadget.xml to a zip file

  Be careful to add the files to the zip file, NOT the folder containing them.

Step 5: Now change the extension of the zip file to .gadget. You can either do this by going to folder options > View and disabling the Hide extensions for known file types and then changing the extension. Or else you can do it using command prompt.

Step 6: Now you will have ended with a windows gadget file. Open it and click install and if all went right a new gadget would appear on your desktop!

ANy doubt Ask in comments always welcome ....

Video :- 

       Video will be soon..


Continue Reading →

Hide or embed files in image files


This is a simple trick to hide any files inside a picture file like a jpg or png image. This is very simple and needs only command prompt and a file compression tool like WinRAR.

Caution : If you dont have winrar please take time and go to our homepage and scroll down you will find full version and latest version there..

 Yeah back here.. 
Just follow these steps to turn a normal picture file into a secret file package!

Step 1: Add all the files you want to hide into an archive using WinRAR.

Step 2: Copy the archive and the picture you want to put the files to a new folder.

Step 3: Unselect all the files and right-click while holding Shift and select "Open command window here" from the menu. Or else you can open cmd and change the directory to the directory of the folder. For example if you have put the archive and picture to C:\Users\Anbu\Desktop\Newfolder then type the following command in cmd: cd /d "C:\Users\ANbu\Desktop\Newfolder"

Step 4: Assming that the RAR file name is Secret.rar and the image file is Image.jpg, type the following command into the command prompt window :
 copy /b Image.jpg + Secret.rar FileName.jpg 
Replace FileName with anyname you want for the output image file with the files hidden in it.

You will have a new jpg file with the files hidden in it. 

But How to retrieve files ?

* Be cool .. Now the question is how to retrieve the hidden files from the picture. To do that open the image file with WinRAR. Or else change the extension of the image to .rar and then open it. You will see the file you hid in the picture.

 If an error comes repair the file using WinRAR.Any unexpected error comment below


This is a great way of sending secret files to a friend unsuspiciously unless you decide to hide a large file in the image file and somebody sees that the picture has such a large size! Try it and remember to report any problems and questions.


Continue Reading →

Create a password protected folder with batch file


     * In this tutorial I am going to show you how to create a password protected folder with a batch file. 
This batch file simply hides a folder from view in a special way and then again shows the folder if the correct password is entered. Even if a person manages to get the folder while it is hidden it will seem like Control Panel, not a folder. To make the batch file save the following code as Locker.bat using notepad.


Danger : Dont  modify the coding it may even damage your system data's


  *When you first run the batch file a new folder named NXFolder will be created. Put the files you want to hide into the folder and run the batch file again and confirm that you want to hide the folder. After the folder is hidden run the batch file again and enter the password to unlock the folder. In this code as you can see in the fourth line of the batch file, the password is set to hackbeginz. So enter the password to unlock the folder. To change the password just edit the fourth line of the batch file.

NOTE:
When you copy the batch file to another directory a new secure folder will be created. To move the secure folder to another location, first unlock the folder and copy the folder and the batch file to the new directory.

If you like our posting subscribe us you will be receiving usefull stuffs....
take care bye..

Credits : Noor mohammed

Continue Reading →


 Make a simple calculator in HTML using VBScript


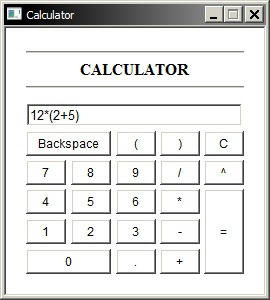
*This is a very simple calculator made with HTML and coded with VBScript. This hta file simply evaluates the expression in the text box. The expression can be entered using the mouse to click the buttons or else from the keyboard. To prevent the chance of invalid data being entered, only numerical keys and the signs are allowed on the keyboard. Also you can use Enter key to evaluate the expression and C to clear the text box.
To make the calculator just save the following code with a .hta extension using notepad. Hope this code helps you improve your scripting! Happy Hacking..


Continue Reading →

Create new partitions on windows 7      hard disk 

Create New partions in windows 7


Today I am going to show you how to create new partitions on windows 7 hard drive. This instructable is complete with pictures and step by step procedures so I think you won't have any difficulties in understanding.


 Step 1: Right click Computer and select Manage.


Step 2:     Select Storage > Disk Management.


Step 3:   Right click any volume and select Shrink Volume... from the menu.


Step 4: Enter the amount of space in MB to shrink and click Shrink.


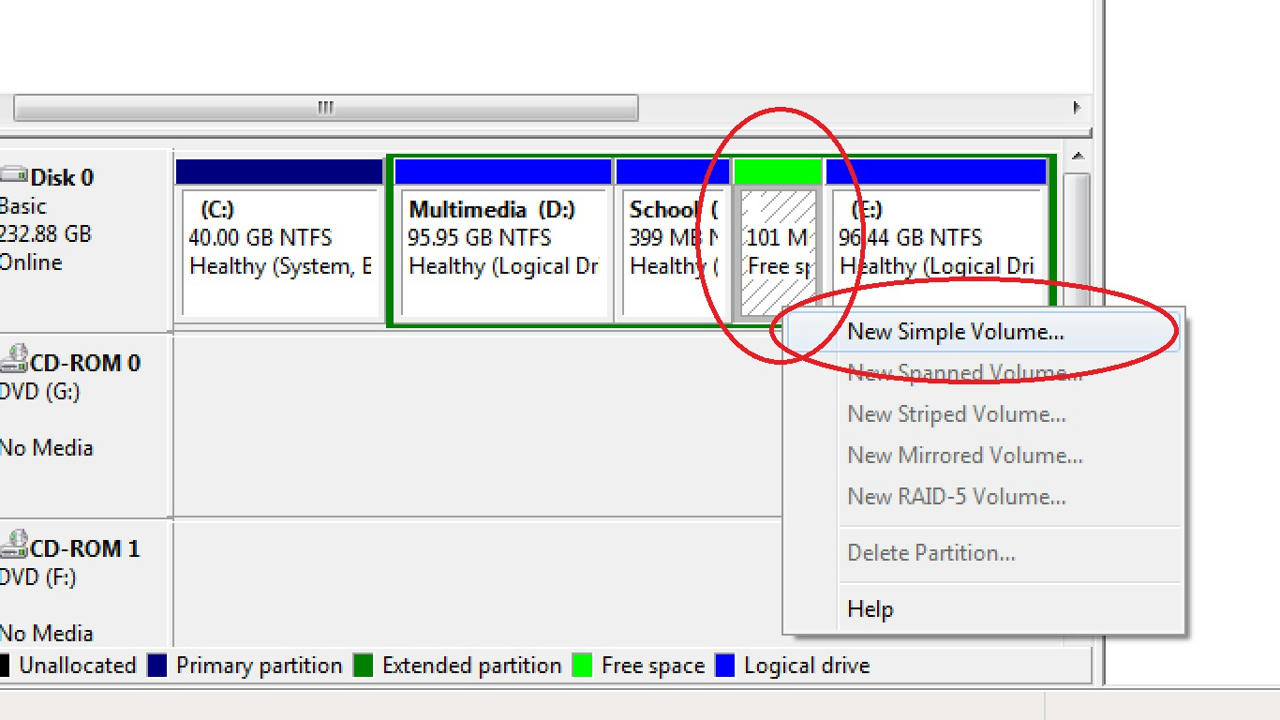
Step 5:  Right click the green space labled 101 MB Free space and select New Simple Volume.


Step 6: Click Next.


Step 7: Specify the new volume size in MB and click Next.


Step 8: Select a drive letter for the new volume and click Next.


Step 9: Specify the file system, name and other settings for the new volume and click Next.


Step 10: Click Finish to create the volume.


Step 11: Wait for a moment and open My Computer. A new volume would be there!


Please remember to leave your ratings and comments. Also if you want to know how to delete the newly created volume leave it in the comments and I will post it. Enjoy!


Continue Reading →

Get a list of all files on a drive


This is a batch file designed to secretly get a list of all the files and folders on a drive via a USB drive. The batch file even lists hidden files. All you have to do is put the batch file into the USB drive and make your victim open it. When you get back the USB drive the list would be waiting for you!
The listing of the files could take some time. So it is essential that the victim does not close the batch file until the listing is completed.

 You can achieve this in two ways:
One way is to run the batch invisibly as a process using two extra short VBScript files. I will show you how to do this in a later post.
The other way is to mask the listing of the files with some spoof like system configuration or something important.
In this trick I am going to use the second method.
This is easier than the first method.

Step 1: Paste the following code into notepad and save as a .bat file.


Step 2: After saving, copy the batch file into the root of your USB drive.

Step 3: Now the trap has been set. Give the USB drive to your friend and use some social engineering to make him/her open it. You can tell your friend that it is a software you made or some cool software. This depends on your social engineering skills. Just make him/her open it remember to tell not to format the USB drive.

When you get back the pendrive the data collected would be in a hidden text file. To reveal the text file:

Step 1: Open command prompt window.
 To open a command window goto start menu and type cmd into the search bar and press enter.

Step 2: Assuming the USB drive letter is F Enter the command into the cmd window and execute it : attrib "F:\XBData.txt" -h -s

After you reveal the text file open it and you will see a list of files stored in his drives including the hidden ones. This trick greatly depends on your skills in social engineering.

Enjoy the look of your friends face when you tell them where he stores certain files and what files he/she has hidden!

 Remember to rate this post and leave any questions.


Continue Reading →

Toggle indicator lights on keyboard


Most probably your keyboard has three indicator lights indicating whether the caps lock, num lock, or scroll lock is on or off. It will be a great trick to show your friends if you can make them flash on and off continuously turning your keyboard into a small disco! So lets turn the keyboard into a disco! No extra software is needed.


*Paste the following code into notepad and save it as a .vbs file.


When you open the file the indicator lights on your keyboard will begin to flash on and off.

Any Damage in my pc ? 

Dont Need to fear .This is completely harmless.

How to terminate it (close it ) ?

To end the program open windows task manager by pressing Ctrl+Shift+Esc and kill a process named wscript.exe under the process tab.


Any problem share with us.. we will provide solution for you ...

Continue Reading →

Make the computer speak

Image

Here is a GUI program which will speak out the text entered into the textbox or speak out the contents of a specified text file. This simple HTML application or hta file coded in VBScript has a stop button to stop the speaking once it has started. Sadly there is no function to pause the speech. :(


 Caution :   DOnt modify the codings There is a chance of damaging your data ..

Do not forget to leave your comments and ratings after trying this out!

Continue Reading →

Hide text in image files

Image

* Sometimes when you want to send secret messages to your friends you would be looking for the most unsuspicious way. Here is a great trick to send text in an image file. Using a simple HTML application to hide the text into the image file according to the password you provide you can send secret messages to your friends. 

Note : 
  Both you and your friend should have the program and must know the password.

To make the HTML application file paste the following code into notepad and save with 
 .hta extension. For example > ByteConceal.hta

Image path:

Password: Image path:

Danger : DOnt modify the files. there is a chance of data corruptions..


Note : Also you can download the executable version of the program here: Download

  *Open the program and you will see a text box for password, a text area for the text, a text box for entering the path for the image file and a button labeled Hide.
 Fill in the fields. The password should be an integer between 1000 and 9999, 

      *The text area contain the text you want to hide. Enter the path for the image file you want to hide the text into. Eg: C:\Users\Anbu\Documents\Secret.jpg. After that press the hide button. Now a new jpg file named XBSecret.jpg will appear in the directory of the program. This file will containing the stored text. Send it your friends!

  *Now to retrieve the text from an image, open the program. You will see a password field and a text box for the image path as well as a Retrieve button in the lower part of the window. Enter the password and the image path. The program will tell you if the image does not contain hidden data or whether the password is incorrect. If you filled in all the fields correctly a new text file named XBText.txt will be created in the same directory as the program and will contain the recovered data.

WARNING: The data in the image file will be lost if you edit it with any picture editing program!
Remember to leave your ratings and comments! Keep tuned to the blog and share the blog on with your friends.


Happy hacking ... bookmark us and enjoy new feeds..

Continue Reading →

Hidden themes in windows 7

Image

Did you know that windows has several hidden themes? Here is an easy trick to unlock the hidden themes.

Step 1:  Paste the following address into the address bar of windows explorer and
press enter : C:\Windows\Globalization\MCT
Step 2:   You will see five folders. Open any of them.

Step 3: Now you will see three folders. Open the folder named theme and open the theme file to install and apply the theme!

Step 4: Repeat step 2 and step 3 for every folder.
 If u love our post You can like Our pages and even join our group ..
thanks any doubt ask me in Comments..


Continue Reading →